SkidWeigh
Plus / Accu-Data Calibration Procedures
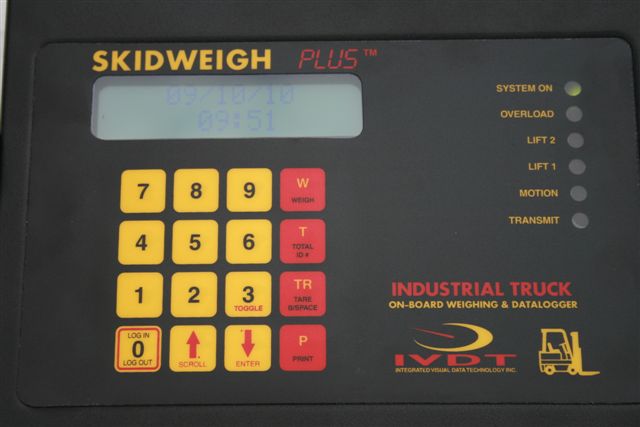
The SkidWeigh Plus Series on-board check weighing system has easy calibration set up procedure system. There are no complicated codes to enter into the system but plain English LCD display messages with scroll down Enter key (ß ) to guide you from the start to the finish. All what you need is a known pallet weight in order to calibrate the scale portion of the system.
After you have entered a special 7 digits calibration code, scroll down, observe the LCD messages and input the data as required.
When asked to enter time, date, vehicle ID#, Department number, etc. use numerical keypad. Use "TR" B/Space key to correct the input value.
Use Toggle key (3) to initiate the scale calibration, change Yes/No status or go through further options.
All what you need is a known load weight nearby to calibrate the scale function of the SkidWeigh system.
When calibrating empty and
loaded forks make sure that you activate lift control valve and lift
the forks off the ground the same way you would do that during the normal
operating activity. This will assure that scale is calibrated to the
actual operating cycle and give you the best possible weight readout
accuracy.
Notes:
Please note that you have 7 seconds to respond to the screen prompt or the LCD display will automatically go back to the default state ( time and date shown on LCD display ).
If a wrong number is entered, use the "TR" key (backspace) to correct any numeric input into the keyboard.
Before you initiate the calibration procedure, make sure that you have nearby the "Known calibration load weight".
At the customer location, pick up the skid with some load and take it to the floor scale. Make a note of the total load weight. (At least 50 % or more of forklift lift capacity is recommended for known calibration load weight).
Youll use that known load weight to calibrate the SkidWeigh Plus system.
The set up and calibration includes entering a proper time, date, vehicle ID, type of printer if applicable, weight readout in lbs or kg, etc. and calibration of empty and loaded forks.
When in calibration mode, follow the LCD messages. Use ( ß ) arrow down Enter key to continue with the set up.
Use ( Ý ) arrow up Scroll key to go back if required.
Press the (3) Toggle key to initiate scale calibration (Empty and Loaded forks calibration procedure) or when you look for more available options or need to change of the YES / NO input status as required.
If you have made mistake during the automatic measurement for ADC values for empty or loaded forks during the calibration procedure and if automatic calculated average value is not added properly, than its recommended to start procedure all over.
Just remove power plug to the indicator while you are in calibration mode and system will reset.
Start the set up and calibration procedures all over!
Activating the System Calibration Mode
- Press (0) Log in key.
- The LCD display will show " Enter ID number "
- Press (ß ) Enter key.
- The LCD display will show " Enter Password:"
Enter following numbers in precise order to get into the calibration mode.
7
1 3 4 6 9 2
and than Press (ß ) Enter key.
This is a default master calibration code and all numbers must
be entered in proper sequence otherwise the error message will be shown
on the LCD display
| LCD Display |
Action Required |
Remarks |
Option |
| Change Password? No |
Press (ß ) Enter key |
Do not change |
Press (3) toggle key to change (Special applications) |
| Erase Key codes? No |
Press (ß ) Enter key |
Used for vehicle access control and special applications |
Press (3) toggle key to change |
| Change Key codes? No |
Press (ß ) Enter key |
Used for vehicle access control and special applications |
Press (3) toggle key to change |
| Key code enabled? No |
Press (ß ) Enter key |
Used for vehicle access control and special applications |
Press (3) toggle key to change |
| Application: Forklift |
Press (ß ) Enter key |
Default application is for the forklift application |
Press (3) toggle key to change for other vehicle applications |
| Time: HR:MIN:SEC 11:52:44 |
Press (ß ) Enter key if indicated time on the LCD display is right |
Key in the proper time and press (ß ) Enter key |
|
| Date: YR/MN/DAY 01/08/09 |
Press (ß ) Enter key if indicated date on the LCD display is right |
Key in proper date and press (ß ) Enter key |
|
| Vehicle ID # 1 |
Press (ß ) Enter key if acceptable |
Key in the proper vehicle ID # and press (ß ) key if applicable |
|
| Department # 1 |
Press (ß ) Enter key if acceptable |
Key in the proper department ID # and press (ß ) key |
|
| Min. Lift Time 5 |
Press (ß ) Enter key |
Change only for special applications |
|
| Stats Visible? Yes |
Press (ß ) Enter key |
All data can be viewed on the LCD display |
Press (3) toggle key to disable |
| Printer Type Weigh-Tronix |
Press (ß ) Enter key |
Default printer driver is Weigh-Tronix |
Press (3) toggle key to change |
| PC Download? NO |
Press (ß ) Enter key |
Make sure that this is set to N , unless PC download to be used |
Press (3) toggle key to change |
| Weight in: pounds |
Press (ß ) Enter key |
Default weight indications is in the pounds |
Press (3) toggle key to change to kg |
| Transducer Check 85 |
Press (ß ) Enter key |
It could be any ADC number. It should increase in value if forks lifted! |
Note: This ADC value will indicate that transducer is connected properly! |
| Delay Counts 25 |
Press (ß ) Enter key |
Default value is 25 |
It can be changed to larger value, 50 or 75 but not recommended |
| Trigger Counts 10 |
Press (ß ) Enter key |
Default value is 10 |
It can be changed to lower value 5 or less.It will increase the time to get weight |
| # of ADC samples 50 |
Press (ß ) Enter key |
Default value is 50 |
If increased to larger value, it will take longer to obtain a weight readout |
| Scale limit (lb) 0 |
Press (ß ) Enter key |
Default value 0, which means unlimited weight range readout |
Enter any other value, example 5000 if applicable. |
| Scale Resolution 10.0 |
Press (ß ) Enter key |
Default value is 10 |
Enter any other value, Example: 1, 2, 5, 20, 25, 50 |
| Do you wish to calibrate scale? |
Press (3) Toggle key to calibrate system Important! |
To calibrate system first time or to re-calibrate it, press (3) toggle key |
Press (ß ) Enter key to change anything else, but not to calibrate scale |
| Lower empty forks |
Lower empty forks to the ground. Keep mast in vertical position, press "W" key and lift forks approx. 3-4 " above the ground. |
As soon "W" key is pressed, LCD will display Raise Unloaded Forks |
|
| Weighing |
Do not move vehicle or adjust tilt control |
||
| Weighing + |
After few seconds the + sign will come up |
||
| This ADC value: 599 |
Press (3) Toggle key to initiate another readout for empty forks |
This ADC for empty forks readout is 599. It could be any other number! |
|
| Avg ADC value: 599 |
Press (3) Toggle key |
||
| Average in Another value? |
Press (3) Toggle key |
By pressing (3) key once more it will initiate another measurement for empty forks. |
|
| Lower empty Forks |
Lower empty forks to ground. Keep mast in vertical position, press "W" key and lift forks approx. 3-4 " above the ground. |
As soon "W" key is pressed, LCD will display Raise Unloaded Forks |
|
| Weighing |
Do not move vehicle or adjust tilt control |
||
| Weighing + |
|||
| This ADC value 610 |
Example of the second readout for ADC is 610. It could be any other number! |
||
|
Avg ADC Value 605 |
System will automatically calculate and show average value of these two readings Keep pressing (3) Toggle key if you want to take more readings for empty forks lifted above the ground. |
||
| Average in Another value? |
After few readings taken with empty forks, the average ADC number appears to be close, than press (ß ) Enter key to go to the next step |
If you keep entering the (ß ) Enter Key you will go to the next step |
|
|
Load and Lower Forks |
Load forklift with known weight and lower it to ground. Keep mast in vertical position, press "W" key and lift loaded forks approx. 3-5" above the ground . |
Example: Known load weight of calibrated load is 1800 lbs. Activate lift control valve and lift the load the same way, as you would do it during normal operation. |
|
| Weighing |
Do not move vehicle or adjust tilt control |
| Weighing + |
|||
| This ADC value: 1850 |
Press (3) Toggle key to initiate another readout for loaded forks! |
This ADC number will be higher number than ADC number for empty forks! |
|
| Avg ADC value: 1850 |
Press (3) Toggle key |
||
| Average in Another value? |
Press (3) Toggle key |
||
| Load and Lower Forks |
Lower loaded forkst the ground. Keep mast in vertical position, press "W" key and lift loaded forks approx. 3-4" above the ground. |
As soon as "W" key is pressed, LCD will display, Raise Loaded Forks |
|
| Weighing |
|||
| Weighing + |
|||
| This ADC value: 1858 |
Press (3) Toggle key |
||
| Avg ADC value: 1854 |
Press (3) Toggle key |
||
| Average in Another value? |
Again, either press (3) Toggle key to take more readings or press (ß ) Enter key to go to next step |
||
| Note: If (ß ) Enter key is pressed, than the LCD display will show " Enter load |
|||
| Enter load (lb) 0 |
Now you must key in known load weight value. In our example that was 1800 pounds. |
||
| Enter load (lb) 1800 |
Press (ß ) Enter key after you have keyed in 1800 |
||
| Scale Calibrated |
Calibration scale function of the system is finished |
||
| Lift 1: (lb) 100 |
Press (ß ) Enter key |
Default value is 100 (LED Lift light 1. will come on if weight load is more than 100 lbs) |
Change to any other value if required |
| Lift 2: (lb) 1000
|
Press (ß ) Enter key |
Default value is 1000(LED Lift light 2. will come on if weight load is more than 1000 lbs) | Change to any other value if required |
| Overload: (lb) 3000
|
Press (ß ) Enter key |
Default value is 3000 (LED Lift light 3. will come on if weight load is more than 3000 lbs) |
Change to any other value if required (Overload set point) |
| Finished? |
Press (ß ) Enter key to finish calibration (Important) |
You must press (ß ) Enter key to finish system set up and calibration! |
Calibration Completed
Make sure
that (ß ) Enter
key is pressed after LCD display shows "Finished?"
This will assure that all input data and calibration values are
stored in the memory.